Measuring the temperature of a surface (pipe, mold, engine housing) seems simple at first glance: all you have to do is place a sensor on it. However, in practice, surface temperature measurement is one of the most complex tasks in instrumentation. Even the slightest gap—as small as a millimeter—or improper tightening can skew your readings by several degrees.
Whether you're using a PT100 probe or a thermocouple, here is a step-by-step guide to installing your surface probes according to best practices.
1. The 3 Enemies of Accurate Area Measurement
To understand how to install a sensor, you first need to know what can cause the measurement to fail:
- Thermal contact resistance: Micro-roughness on the surface traps air bubbles. Since air is an excellent insulator, it prevents heat from being properly transferred to the sensor.
- The “fin” effect (heat loss to the surrounding air): If the back of your sensor is exposed to the surrounding air, the sensor will cool down. You will measure a temperature that is somewhere between the wall temperature and the room temperature.
- Thermal Conductivity of Wires: The probe cables can act as heat sinks and carry heat away from the measurement point.
2. Step-by-Step Installation Guide
Step 1: Surface Preparation
A probe should never be placed on a dirty or oxidized surface.
- Clean: Thoroughly degrease the area with a suitable solvent.
- Strip: If the surface is rusty or painted, sand it lightly to expose the metal (unless otherwise specified by the process). Metal-to-metal contact is essential.
Step 2: The Thermal Interface
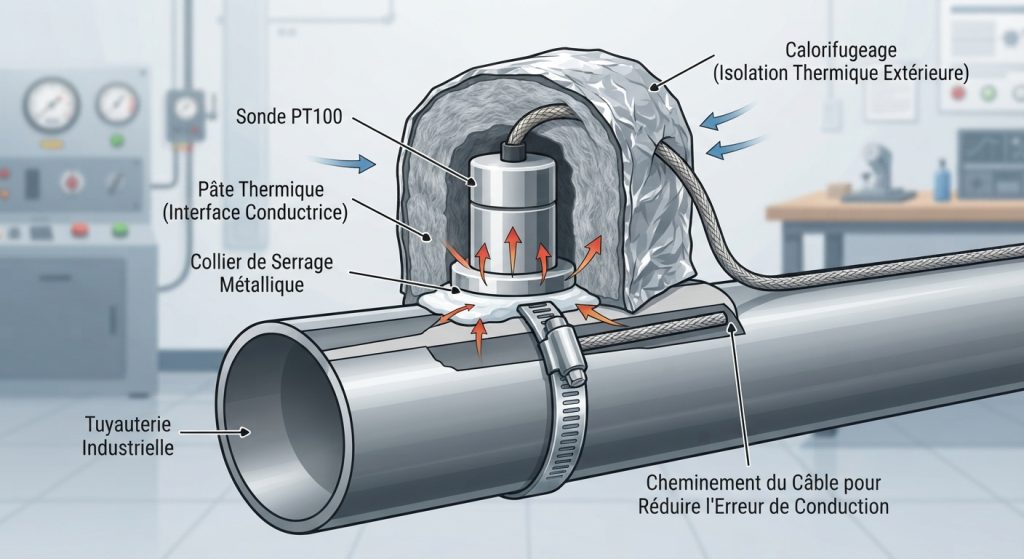
To remove any residual air between the sensor and the wall, apply a thin layer of thermal paste (silicone grease containing thermal conductive fillers).
- Note: A layer that is too thick has the opposite effect and acts as insulation. Apply just enough to cover up imperfections.
Step 3: Mechanical Fastening
The sensor must be held in place with constant pressure. Choose the method that best suits your design:
- On a tube or pipe: Use a clamp (quick-release clamp or flange). Sensors with a clamp-style base fit the tube’s diameter perfectly.
- On a flat, ferrous surface: Choose a magnetic tip. Ideal for temporary or maintenance measurements.
- Permanent mounting: Use screw-in probes (in a blind hole) or solder/glue-on pads with high-temperature epoxy adhesive.
Step 4: Exterior Insulation (Crucial)
This is the step that’s most often overlooked. To minimize the effect of ambient air, you need to insulate the sensor.
- Cover the back of the sensor and the surrounding area with an insulating sleeve, rock wool, or high-temperature insulating tape.
Step 5: Cable Routing
To prevent the cable from "drawing" heat away from the sensor:
- Run the cable along the hot surface for a few centimeters (at least 10 to 20 times the cable’s diameter) before routing it away toward the controller. This is called the thermal immersion length.
3. Summary of Best Practices by Technology Type
| Technology | Points to Watch for During Implementation | recommendations |
|---|---|---|
| PT100 Probe | Sensitive to mechanical stress. Excessive tightening or crushing can break the platinum component or alter its resistance. | Use a 3- or 4-wire configuration to eliminate errors caused by the length of the connecting cable. |
| Thermocouple | The measurement is taken only at the point where the two wires are soldered together. If the rest of the body touches the wall, it doesn't count. | Make sure the hot solder (the tip or contact pad) is pressed firmly against the target. |
Even the best-chosen surface probe is useless if it is not installed properly. By ensuring perfect contact, constant pressure, and proper insulation, you guarantee the repeatability and reliability of your measurements.
Permanent or Temporary Mounting: How to Choose the Right Setup?
The method used to install a surface probe directly affects the long-term reliability of the measurement and maintenance costs. There are two main types of installation.
1. Temporary Setups: Agility and Diagnosis
These setups are ideal for energy audit campaigns, preventive maintenance, identifying hot spots, or process validation (R&D).
Key technologies:
- Magnetic probes (magnetized): Equipped with a powerful neodymium or samarium-cobalt magnet (for high temperatures). They instantly attach to the ferrous surfaces (steel, cast iron) of motors, pumps, or pipes.
- Self-adhesive sensors: These often take the form of thin thermocouples (pads) embedded in a technical adhesive tape (Kapton or fiberglass). They are applied directly to the surface.
- Spring-loaded clamps and handheld sensors: Instrumented alligator clips that clip onto pipes, or handheld probes with a spring-loaded tip that the operator holds manually against the pipe wall.
Advantages & Limitations:
- The Plus: Installs in seconds, no tools required, no drilling, and does not damage the machine.
- Cons: Sensitive to drafts (which are often difficult to properly insulate against); the adhesive does not hold up well to heat and may peel off in the event of strong vibrations.
2. Permanent Installations: Reliability and Durability
Essential when the probe is connected to a PLC to control a process (for example, the temperature of a plastic injection mold or a steam line).
Key technologies:
- Screw-on Mounting (Blind Hole): The most reliable method. A blind hole (non-through hole) is drilled in the metal part, thermal paste is applied, and a probe—either threaded or secured by a sliding fitting—is screwed into the hole. The tip of the probe is mechanically pressed against the bottom of the hole.
- The fixed clamp (flange or stainless steel clamp): The sensor is welded to a curved plate (base plate) that fits the pipe’s diameter perfectly. The assembly is permanently secured with a metal clamp and then completely encased in the pipe’s insulation.
- High-performance structural bonding: Permanent bonding using heat-conductive two-component epoxy or ceramic adhesives capable of withstanding vibrations and harsh chemical environments.
Advantages & Limitations:
- Key Benefits: Excellent measurement repeatability, complete protection against ambient air, and maximum resistance to vibrations and aging.
- Cons: Cumbersome installation (sometimes requires stopping the process, drilling, or tapping); replacing the sensor is more complicated in the event of a failure.